Qué es PostGIS?
PostGIS es una extensión espacial de base de datos open source de libre acceso y bastante compatible OGC, para PostgresSQL Database. Agrega funciones espaciales tal como distancia, area, unión, intersección, y especialmente tipos de datos geométricos a la Base de Datos.PostGIS es muy similar en funcionalidad a SQL Server 2008 Spatial support, ESRI ArcSDE, Oracle Spatial, and DB2 spatial extender. La última versión ahora viene empaquetada con el instalador del PostgreSQL DBMS como un optional add-on.
Instalando en Windows
Se asume una instalación de ambiente Windows para este tutorial, pero mucho de este tutorial aplica a otras plataformas soportadas como Linux, Unix, BSD, Mac, etc. Se usará como ejemplos los datos de Massachusetts/Boston data. Para usuarios desktop, el instalador enterpriseDB existe para Mac/OSX y Linux desktops, por lo que cualquiera debiera ser capaz de seguir adelante sin demasiada complejidad.
Instalando PostgreSQL con la Funcionalidad PostGIS
No se entrará en muchos detalles debido a que el wizard install en muy simple. A continuación se detallan los pasos a seguir:
Note para usuarios Vista: Debido a la politica de seguridad de Vista, es posible que encuentre problemas al instalar PostgreSQL. Refierasé a el Windows Vista gotchas en el wiki de PostGIS wiki si la instalación te da problemas.
- Descargar el instalador de su plataforma específica desde el site PostgreSQL Binary Download. Este tutorial está escrito para la versión PostgreSQL 9.0.2-1 y se asume la versión de PostGIS 1.5.
- Ejecutar el instalador postgresql-9.0.2-1-windows.exe

- Indicar carpeta o directorio de instalación
- Indicar carpeta o directorio de instalación de datos
- Ingresar contraseña de admin
- Ingresar el puerto de comunicación, por defecto 5432
- Seleccione la configuración regional
- Terminada la instalación, se ofrece ejecutar Stack Builder, seleccionar esta opción para instalar los adicionales
Instalación de Adicionales
- Seleccionar la instalación (ejemplo PostGres SQL on port 5432)
- Configurar proxy server si su conexión a Internet así lo requiera.
- Seleccionar las aplicaciones a instalar. Se recomienda seleccionar todos los Drivers y Spatial extension (PostGIS).
- Seleccionar el servidor de descarga, elegir aquel que esté más cercano a su instalación.
- Seleccionar la carpeta para la descarga de las instalaciones
- La instalación termina informando "All the instalation files have been successfully downloaded"
- En el siguiente paso un wizard instalará los drivers.
- Un nuevo wizard instalará PstGIS. Ingresar la password de la cuenta admin (postgres). Indicar el nombre de la Base de Datos para PostGIS, por defecto postgis
- El wizard pregunta si se desea utilizar una interfaz gráfica cargar datos cartográficos a PostGIS, es una muy buena interfaz, se recomienda aceptar la instalación.
Creating a spatial database
PostgreSQL comes packaged with a fairly decent admin tool called PgAdmin3. If you are a newbie, its best just to use that tool to create a new database.
- On windows PgAdmin III is under Start->Programs->PostgreSQL 8.4->PgAdmin III
- Login with the super user usually postgres and the password you chose during install. If you forgot it, then go into pg_hba.conf (just open it with an editor such as notepad or a programmer editor). Set the line
host all all 127.0.0.1/32 md5

to

host all all 127.0.0.1/32 trust
This will allow any person logging locally to the computer that PostgreSQL is installed on to access all databases without a password. (127.0.0.1/32) means localhost only (32 is the bit mask). Note you can add additional lines to this file or remove lines to allow or block certain ip ranges. The lines highest in the file take precedence.
So for example if you wanted to allow all users logging in access as long as they successfully authenticate with an md5 password, then you can add the line
. If it is below, you will still be able to connect locally without a password but non-local connections will need a valid username and password.host all all 0.0.0.0/0 md5
Note: - The newer versions of PgAdmin III (1.7 something on) allow editing Postgresql.conf and pg_hba.conf using the PgAdmin III tool. These are accessible from Tools->Server Configuration and provide a fairly nice table editor to work with. This feature is only available if you have installed the adminpack.sql (this is located in C:\Program FIles\PostgreSQL\8.x\share\contrib) (Admin Pack) in thepostgres database. - Now for the fun part - Create your database. Call it gisdb or whatever you want. In newer versions of PostgreSQL, if you chose PostGIS in the first part, there is a template database calledtemplate_postgis. Chose this as a template.
- Its generally a good idea to create a user too that owns the database that way you don't need to use your superuser account to access it.
- UPDATE: - The remaining steps in this section are not needed if you chosetemplate_postgis for your new database. However if you are trying to spatially enable an existing database or you didn't get the template_postgis option. Do the remaining steps. Next go to tools->Query tool in pgAdmin III and browse to the postgresql install contrib postgis.sql file (on Windows the default install is Program files\Postgresql\8.4\share\contrib\postgis-1.5\postgis.sqlIf you are trying to upgrade an already spatially enabled postgis database, then instead of running postgis.sql run one of the postgis_upgrade_*.sql files. So if for example you are upgrading a database from PostGIS 1.4 to 1.5 run postgis_upgrade_14_to_15.sql.
- On the Query tool, make sure you gisdb is selected and then click the green arrow. You'll get a bunch of notices - not to be alarmed.
- Next open up the spatial_ref_sys.sql (on windows Program files\Postgresql\8.4\share\contrib\postgis-1.5\spatial_ref_sys.sql. This step loads thousands of spatial reference system records which is used by PostGIS Projection library to transform from one spatial coordinate system to another.As of PgAdmin III 1.10 -- the Plugin Icon has PSQL as an option and if you responded to the message Yes to the Overwrite my plugins.ini, you should get an additional PostGIS Shapefile and DBF Loader option.If the Plugins green is disabled (and says No Plugins installed) then most likely you have another PgAdmin or PostgreSQL install getting in the way. An easy fix is to open up PgAdmin III go under File->Options and make sure your PG bin path is pointing at the locations of your PostgreSQL bin (e.g. C:\Program Files\PostgreSQL\8.4\bin) and click the ... to repoint it if it is not.
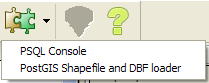 . This option should become ungreyed when you select a database and when you launch it, it will pass in the credentatials to the database for you and launch a PSQL connection.
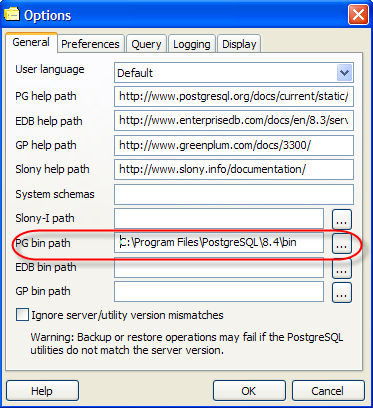
On windows the file is located in C:\Program Files\PostgreSQL\8.4\share\contribs\adminpack.sql. It is located in the share folder of Linux installs as well. To install it --- switch to postgres database and run the adminpack.sql script in that database.
Loading GIS Data Into the Database
Now we have a nice fully functional GIS database with no spatial data. So to do some neat stuff, we need to get some data to play with.
Get the Data
Download data from the MassGIS site.
For this simple exercise just download Towns with Coast
Extract the file into some folder. We will only be using the _POLY files for this exercise.
For this simple exercise just download Towns with Coast
Extract the file into some folder. We will only be using the _POLY files for this exercise.
NOTE: Someone asked how you extract the file if you are on a linux box.
---FOR LINUX USERS ---
---FOR LINUX USERS ---
If you are on Linux/Unix, I find the exercise even easier. If you are on linux or have Wget handy - you can do the below to download the file after you have cded into the folder you want to put it in.
wget ftp://data.massgis.state.ma.us/pub/shape/state/towns.exeNow to extract it simply do the following from a shell prompt
unzip towns.exe---END FOR LINUX USERS ---
NOTE: As of PostGIS 1.5.0, the windows build is now packaged with a shp2pgsql Graphical User Interface. You can alsodownload it separately if you are using a lower version of PostGIS or want to load data from a separate workstation that doesn't have PostgreSQL installed.download this separately and use with any version of PostGIS from 1.2 - 1.5.0 and enable it as a Plug-In in PgAdminIII . Check out our screencast on configurating the shp2pgsql-gui as a PgAdmin III plug-in and using it. or our write-up on registering it
Figure out SRID of the data
You will notice one of the files it extracts is called TOWNS_POLY.prj. A .prj is often included with ESRI shape files and tells you the projection of the data. We'll need to match this descriptive projection to an SRID (the id field of a spatial ref record in the spatial_ref_sys table) if we ever want to reproject our data.
- Open up the .prj file in a text editor. You'll see something likeNAD_1983_StatePlane_Massachusetts_Mainland_FIPS_2001 and UNIT["Meter",1.0]
- Open up your PgAdmin III query tool and type in the following statement
select srid, srtext, proj4text from spatial_ref_sys where srtext ILIKE '%Massachusetts%'And then click the green arrow. This will bring up about 10 records. - Note the srid of the closest match. In this case its 26986. NOTE: srid is not just a PostGIS term. It is an OGC standard so you will see SRID mentioned a lot in other spatial databases, gis webservices and applications. Most of the common spatial reference systems have globally defined numbers. So 26986 always maps to NAD83_StatePlane_Massachusetts_Mainland_FIPS_2001 Meters. Most if not all MassGIS data is in this particular projection.
Loading the Data
The easiest data to load into PostGIS is ESRI shape data since PostGIS comes packaged with a nice command line tool called shp2pgsql which converts ESRI shape files into PostGIS specific SQL statements that can then be loaded into a PostGIS database.
This file is located in the PostGresql bin folder which default location in Windows is Program Files/PostGreSQL/8.4/bin
Make a PostGIS mini toolkit
Since these files are so embedded, it is a bit annoying to navigate to. To create yourself a self-contained toolkit you can carry with you anywhere, copy the following files from the bin folder into say c:\pgutils:
comerr32.dll krb5_32.dll libeay32.dll
libiconv-2.dll libintl-2.dll libpq.dll pgsql2shp.exe psql.exe
pg_dump.exe pg_restore.exe shp2pgsql.exe ssleay32.dll
Note: The GUI loader is packaged as a self-contained postgisgui folder in the bin of your PostgreSQL install. If you prefer the GUI interface, you can copy that folder and run theshp2pgsql-gui.exe file from anywhere even an external file network path.
Load Towns data
- Open up a command prompt.
- Cd to the folder you extracted the towns data
- Run the following command:
c:\pgutils\shp2pgsql -s 26986 TOWNS_POLY towns > towns.sql - Load into the database with this command:
psql -d gisdb -h localhost -U postgres -f towns.sql
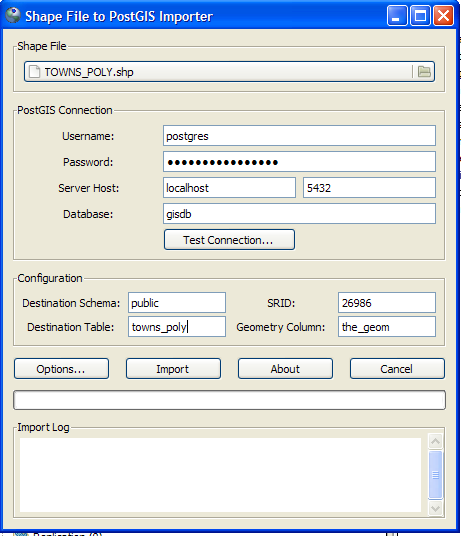
If you are on another machine different from the server, you will need to change localhost to the name of the server. Also you may get prompted for a password. For the above I used the default superuser postgres account, but its best to use a non-super user account. - Alternatively you can use the gui to load the data and when you do, your screen will look something like this.
Indexing the data
Table indexes are very important for speeding up the processing of most queries. There is also a downside to indexes and they are the following
- Indexes slow down the updating of indexed fields.
- Indexes take up space. You can think of an index as another table with bookmarks to the first similar to an index to a book.
Given the above, it is often times tricky to have a good balance. There are a couple general rules of thumb to go by that will help you a long way.
- Never put indexes on fields that you will not use as part of a where condition or join condition.
- Be cautious when putting index fields on heavily updated fields. For example if you have a field that is frequently updated and is frequently used for updating, you'll need to do benchmark tests to make sure the index does not cause more damage in update situations than it does for select query situations. In general if the number of records you are updating at any one time for a particular field is small, its safe to put in an index.
- Corrollary to 2. For bulk uploads of a table - e.g. if you are loading a table from a shape, its best to put the indexes in place after the data load because if an index is in place, the system will be creating indexes as its loading which could slow things down considerably.
- If you know a certain field is unique in a table, it is best to use a unique or primary index. The reason for this is that it tells the planner that once its found a match, there is no need to look for another. It also prevents someone from accidentally inserting a duplicate record as it will throw an error.
- For spatial indexes - use a gist index. A gist basically stores the bounding box of the geometry as the index. For large complex geometries unfortunately, this is not too terribly useful.
The most common queries we will be doing on this query are spatial queries and queries by the town field. So we will create 2 indexes on these fields.
CREATE INDEX idx_towns_the_geom ON towns USING gist(the_geom); CREATE INDEX idx_towns_town ON towns USING btree(town);Querying Data
Go back into PgAdmin III and refresh your view. Verify that you have a towns database now.
Test out the following queries from the query tool For PostGIS installations of 1.2.2 and above, the preferred function names start with ST_
SELECT ST_Extent(the_geom) FROM towns WHERE town = 'BOSTON';

SELECT ST_Area(ST_Union(the_geom)) FROM towns WHERE town = 'BOSTON';
Old syntax pre PostGIS 1.2.2 - this will not work in PostGIS 1.4+. If you have old code like this -- change it to the above syntax. We have crossed out the below code to demonstrate it is BAD
 SELECT Extent(the_geom) from towns where town = 'BOSTON';

SELECT Area(GeomUnion(the_geom)) FROM towns where town = 'BOSTON';
Most functions in new postgis installs just have an ST_ prefixed, except for GeomUnion which became ST_Union. The other difference is that relational operators with ST_ now automagically use index operators where as the ones without ST_ you need to do an additional && call.
Example:
a.the_geom && b.the_geom AND Intersects(a.the_geom,b.the_geom)can simply be written asST_Intersects(a.the_geom, b.the_geom)If the above gives you an error such as mixed SRIDs, most likely you are running 1.3.2 postgis which was very defective. Upgrade to 1.3.3 at your next opportunity. To verify your install -
SELECT postgis_full_version();Viewing the Data
If you are a GIS newbie, I highly recommend using Quantum GIS. Quantum GIS has ability to view PostGIS data directly, do simple filters on it, is free, is cross-platform (Linux, and Windows and some others) and is the least threatening of all the GIS Viewers I have seen out there for people new to GIS.